Terraform with GCP Cloud

Here, in this article we are going to create basic networking architecture of GCP like VPC, Subnets, Firewalls, Routes, IAP Tunnel, Internet Gateway, Cloud NAT and Cloud Router using Terraform (Infrastructure as Code)
I’ll walk through the process to create resources in Google Cloud by using Terraform. I will be creating VPC network, one sub-networks — private in us-central1 region , firewall rules allowing ssh and icmp access, virtual instance in sub-network running which will be running as a web server and not having any External IP and cloud router and nat gateway which will help private instance to access internet.
What is Terraform ??
HashiCorp Terraform is an open source infrastructure as code (IaC) software tool that allows DevOps engineers to programmatically provision the virtual resources an application requires to run.
Advantages of Using Terraform ??
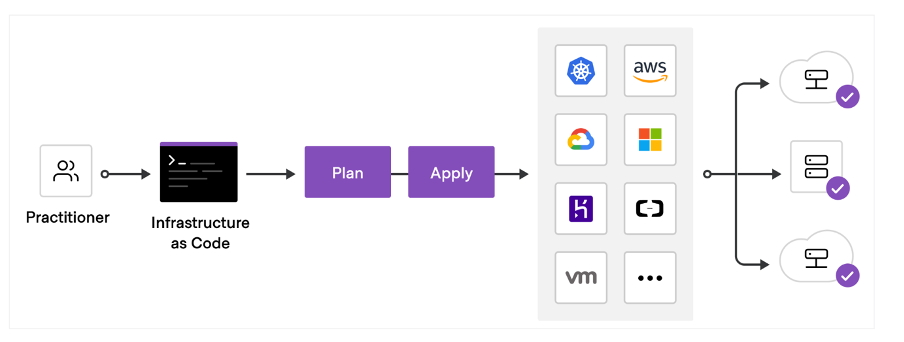
1. Terraform is cloud-agnostic and allows a single configuration to be used to manage multiple providers, and to even handle cross-cloud dependencies. This simplifies management and orchestration, helping operators build large-scale multi-cloud infrastructures.
2. Terraform not only handles IaaS (AWS, Azure, etc) but also PaaS (SQL, NodeJS). It can also store local variables such as cloud tokens and passwords in encrypted form on the terraform registry.
3. Automate consistent workflows and create a pipeline for provisioning Infrastructure as Code.
4. Terraform allows you to collaborate on your infrastructure with its remote state backends.
5. Terraform keeps track of your real infrastructure in a state file, which acts as a source of truth for your environment.
To download Terraform , go through this link : Download Terraform
Steps to create the flow
You can put everything(resources) in a single file and run terraform but the best practice is to break down the components into multiple files and use modules wherever possible to reuse it later.
This is the terraform project file structure

GCP → This directory is having all the terraform files in it
backened.tf → It defines where terraform stores its state data files, we are storing the files in the Cloud Storage Bucket (GCS).
credentials.json →The key file of the service account we created to access the GCP account as an editor role
main.tf → This is where modules of the resources are mentioned and they are pointing to the modules folder.
provider.tf →Defines Google as the provider
script.sh →Contains script file which is passed in startup script in compute engine
terraform.tfvars →This file is used to set the actual values of the variables.
variables.tf →This file is used to define the variables type and optionally set a default value.
Modules →This directory contains all resources.tf files which we want to create in GCP account.

$terraform init The terraform init command is used to initialize a working directory containing Terraform configuration files. It initializes modules, backend and plugins and creates a .terraform.lock.hcl file which is a lock file for various items that Terraform caches in the . terraform subdirectory of your working directory. Terraform automatically creates or updates the dependency lock file each time you run the terraform init command.
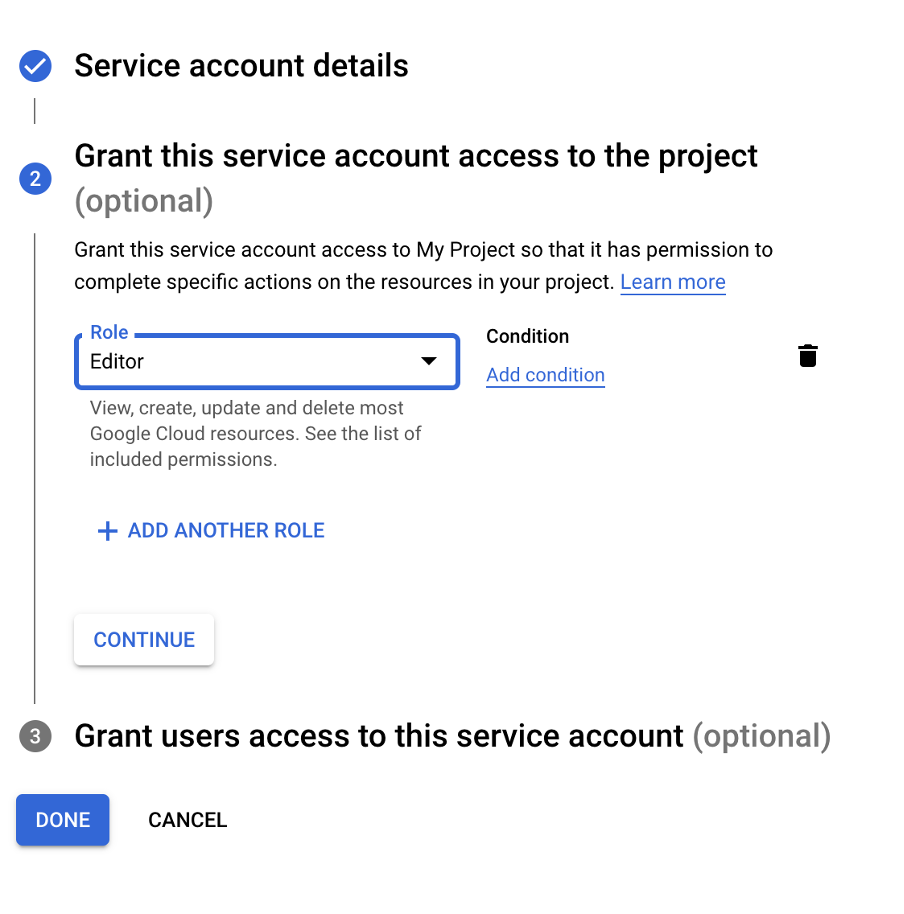
First create a service account with Editor role which we will use in terraform . Terraform will use this role to create, edit and delete resources in the GCP account .
Provider.tf
Here in provider.tf we are using google provider with version 3.5.0 and have passed key file as a variable in credentials attribute which we have created in service account (Editor Role). Pass region and zone where you want to create your resources.

Main.tf
Here in main.tf we are defining modules which creates all GCP resources that are defined under each module folder. You can see the source is pointing to modules folder where all resources.tf are defined. The variables defined in outer directory(gcp directory) is correlated with variables defined in modules directory.
module “module-name(You can add any relevant name to module){}

Variables.tf
Here in variables.tf we are define the variables type and optionally set a default value .These variables we are going to use in our resources.tf files .
Assume If we are creating a lot of resources and assume if we need to change any attributes value then it would be very troublesome to find the resource.tf where we need to change attributes value, that’s why we use a central file where we store all variables.

Terraform.tfvars

This file is used to set the actual values of the variables. So, the workflow is terraform first check the terraform.tfvars file for variables value and if not found take the default values defined in variables.tf file. Example: Assume in terraform.tfvars file, we have set “name” variable as “demo” and in variables.tf we have set “name” variable as “test” . So it will take “demo” as value .
If in case in “name” variable is not mentioned in terraform.tfvars file , then it will take “test” as value (which is mentioned in variables.tf file).
Backend.tf
It defines where terraform stores its state data files, we are storing the files in the Cloud Storage Bucket (GCS). This state is stored by default in a local file named “terraform. tfstate”, but it is a best practice to stored it remotely, which works better in a team environment. Storing your state remotely also adds an increased layer of durability, it’s a lot harder to accidentally delete your tfstate file when it is stored remotely. It also provides locking support which prevents anybody from writing to the remote state file whilst someone else is writing to it.
Here we are passing bucket name in bucket attribute and prefix is the directory where you want to create your .tfstate file(“terraform” directory will create automatically after terraform apply command) and pass credentials file which we created earlier for service account.


This is the bucket where we are storing the .tfstate files.
Modules Directory
Inside our Modules Folder we have created compute engine, vpc, subnets, firewall rules, Nat gateway, Cloud Router resources.tf files
VPC.tf and Subnets.tf

Every provider comes with a set of resources. resource, as the name suggests, represents the actual cloud resource to be created in the configuration language. We start with a resource block named “google_compute_network” and we pass a label and name it as “demo_vpc_network”. The label is the name of your choice.
Here we are creating vpc named as “demo-vpc” and subnetwork named as “demo-subnet1-us-central1”, we have assigned “demo” value in ${var.name} variable. The auto_create_subnetworks is set to false which means it will not create subnetworks in each region automatically.
Then we are creating a subnetwork whose Ip range we have passed and network attribute is passed as <resource type> <label>. <attribute>, here we are passing google_compute_network. demo_vpc_network.id which means this subnet should be created in the VPC ID “demovpc” . The depends_on is a meta tag that allows you to specify dependencies between resources and modules.
Here we are telling that subnetwork is depending upon vpc, so first create vpc and then subnetwork.
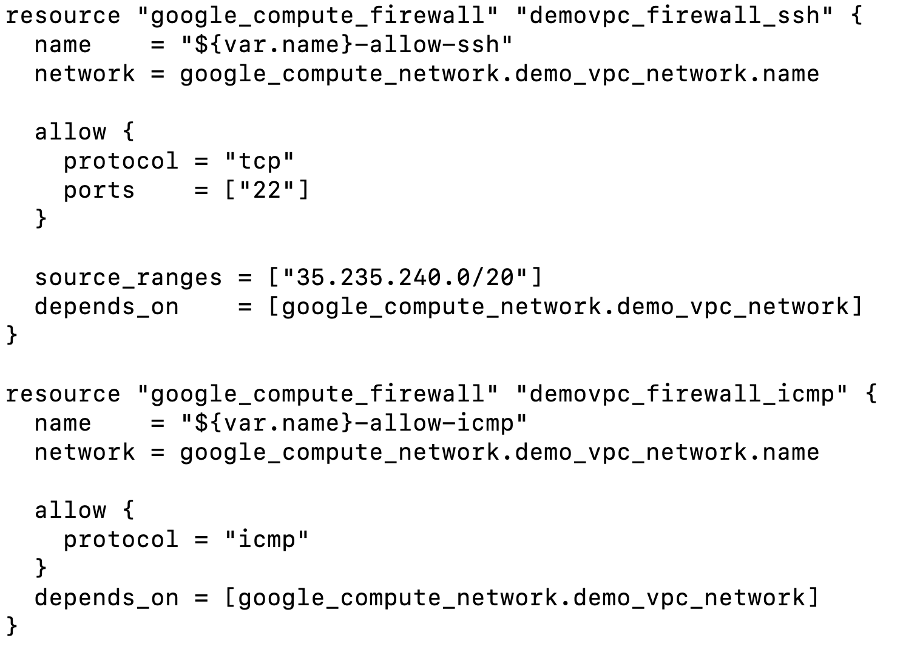
Firewall.tf
Here we are creating firewall rules using “google_compute_firewall” type where we have created 2 firewall rules . The first one is allowing ssh using IAP tunnel (added IP range of IAP in source_ranges attribute) and in the second we have allowed icmp protocol
Router.tf and Nat.tf
Here we are creating cloud router and Nat gateway, through which the private compute engine will be able to access the internet.

Compute-Engine.tf
Here we are creating compute engine named as “demo-instance” using “google_compute_engine” resource type.

You can get the machine_type and image attribute value for your resource by using gcloud command
$ gcloud compute machine-types list — filter=”zone:(us-central1-a) name~standard”


$ gcloud compute images list — filter=”name~’ubuntu’”

In network_interface block we have mentioned our custom vpc and network. And for our metadata_startup_script attribute we have passed our script.sh file which we can use to install n numbers of software or tasks during the startup process of a virtual machine (VM) instance.
In the script.sh file we are installing nginx web server in our compute engine.

We are doing terraform plan now.
$terraform plan This command evaluates the Terraform configuration to determine the desired state of all the resources it declares, then compares that desired state to the real infrastructure objects being managed with the current working directory and workspace.


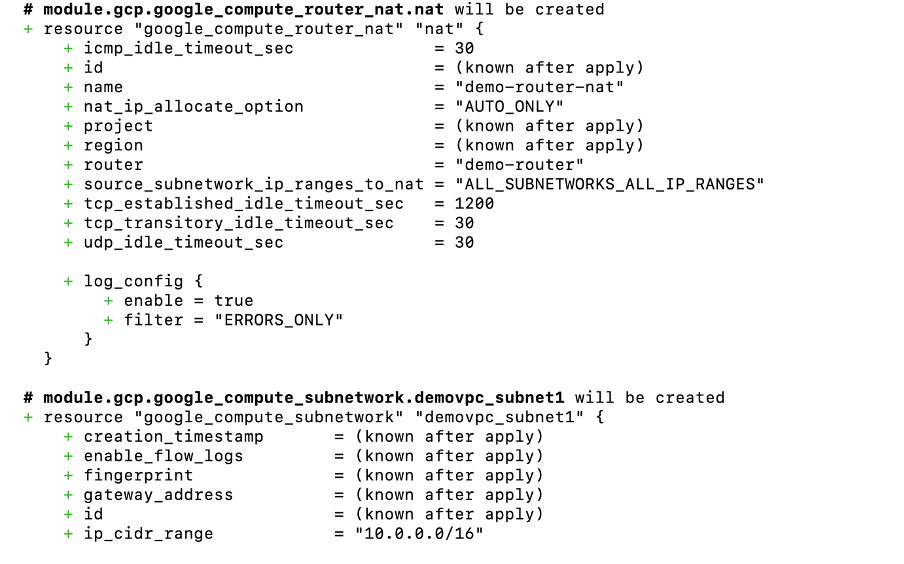

It is showing what resources will create. In total it is showing 7 resources are getting added and 0 to change and destroy.
Then we did terraform apply
$terraform apply It performs a plan just like terraform plan does, but then actually carries out the planned changes to each resource using the relevant infrastructure provider’s API. It asks for confirmation from the user before making any changes, unless it was explicitly told to skip approval. Locking happens at this stage.


Here we can see that 7 resources are created successfully.
We can see the .tfstate file in GCS bucket.

Let’s go to the GCP Console and see the resources created


When we ssh into the compute engine “demo-instance”, we can see that nginx web server is running and we are also able to access the example.com web page


For code reference (Terraform files ) , go to the below link : Terraform-with-GCP
Terraform Module Registry : Google Terraform Registry


Comments
Post a Comment