Jenkins Pipeline — Jfrog Artifactory and Jenkins Integration
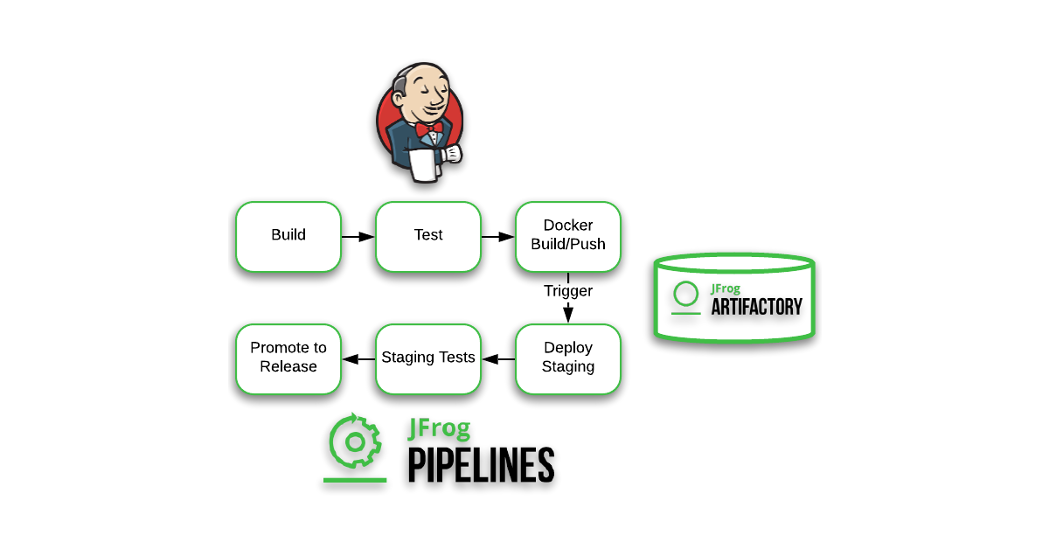
In this article, we will be discussing about how we can integrate Jfrog with Jenkins Declarative Pipeline where we are uploading maven binaries files and pushing Docker images and Trivy test scan results into the Jfrog Artifactory.
What is Jenkins?
Jenkins is an open source automation server. It helps automate the parts of software development related to building, testing, and deploying, facilitating continuous integration and continuous delivery.
What is Jfrog Artifactory?
It is a universal DevOps solution providing end-to-end automation and management of binaries and artifacts through the application delivery process that improves productivity across your development ecosystem .It act as a sort of buffer for downloading dependencies for the built tools and languages.
Why should we use Jfrog Artifactory ??
1. Maintain a single source of truth
2. Reliable and Consistent Access to Remote Artifacts
3. Reduce Network Traffics and Optimize Builds
4. Combine Local and Remote Repositories
5. Build Once and Share
6. Security, Access Control and Traceability
7. Scale with On-Prem,Cloud and Hybrid
8. System Stability and Reliability with high availability
9. Managing Binaries across different environments
10. It has full support for CHEF
Steps Involved in Integration:

1.Run Jenkins and Jfrog as Docker containers
Jenkins which is running at port 8080 :
$docker run -d -p 8080:8080 -p 50000:50000 -v /var/run/docker.sock:/var/run/docker.sock -v /Users/nansahu/desktop/DevSecops/jenkins_configuration:/var/jenkins_home — name jenkins-docker jenkins-docker

Jfrog which is running at port 8082:
Creating a volume“artifactory-data” : docker volume create artifactory-data
Running the container: docker run -d — name artifactory -p 8082:8082 -p 8081:8081 -v artifactory-data:/var/opt/jfrog/artifactory releases-docker.jfrog.io/jfrog/artifactory-pro:latest

To install jfrog in Debian/Ubuntu use these commands,

Then reset your password and activate license if any and set any base url (set domain name if you have) and create Repositories of the project type you are working on, in my case it is Maven.

Install the Artifactory Plugin in Jenkins
In the Jenkins Page, Go to Manage Jenkins -> Manage Plugins and search for Artifactory Plugin and Click on ‘Download now and install after restart’

Jenkinsfile for CI/CD Pipeline

Initially, we are cloning git repository from artifactory branch into the Jenkins workspace and in the second stage we are building our maven application from pom.xml which is creating an Artifact in Jenkins workspace folder. We have created some environment variables which we are going to user in the later steps , ARTIFACTORY_ACCESS_TOKEN which is a variable used in Jenkins Pipeline for providing token credentials to access jfrog and JFROG_PASSWORD which is a variable used in Jenkins Pipeline for storing the password for Jfrog Platform.
Here, we can see that the Jar files are getting created as the build is successful

See the test results here (Build Success) , 0 Failures

To create a token in Jfrog , Go to Jfrog Platform -> Administration -> User Management -> Access Tokens -> Add Description and add username through which you login into jfrog account and add the Expiration time and Generate Token.

Go to Manage Jenkins-> Manage Credentials-> Choose Secret Text type credential and paste the token which is generated in Jfrog Platform and add ID and Description as artifactory-access-token

Go to Manage Jenkins-> Manage Credentials-> Choose Secret Text type credential and add the password of jfrog through you login to Jfrog Platform add ID and Description as jfrog-password

In Jfrog Platform , we will now create different repositories ( Go to Administration -> Repositories -> Create a Local Generic Repository named “java-web-app” and keep everything default and Create . We are creating this repository to the upload the artifacts created in the Maven Build.

Then we install jfrog-cli in Jenkins container so that we can use it in our Jenkins Pipeline

Steps for Debian/Ubuntu for JFrog CLI
$wget -qO — https://releases.jfrog.io/artifactory/jfrog-gpg-public/jfrog_public_gpg.key | sudo apt-key add –
$echo “deb https://releases.jfrog.io/artifactory/jfrog-debs xenial contrib” | sudo tee -a /etc/apt/sources.list;
$apt update;
$apt install -y jfrog-cli-v2-jf;
In the next step , we are uploading binaries from Maven Build to Jfrog Artifactory . We are using jfrog cli here to upload the ‘target/demo-0.0.1-SNAPSHOT.jar files’ into java-web-app repository , we are passing the authentication token which we have created earlier and we are passing — url parameter (URL of the Jfrog http://<dockerip>:8082/artifactory) here

The jar files are getting uploaded successfully . This is the output of Jenkins Pipeline

You can see that the jar file is created inside target folder of java-web-app repository

Create another repository for Pushing Docker Images (Go to Administration -> Repositories -> Create a Local Docker Repository named “java-web-app-docker” and keep everything default and Create .

To manually set your credentials, or if you are using Docker v1, copy the following snippet to your ~/.docker/config.json file. Format is
{
“auths”: {
“https://artprod.mycompany": {
“auth”: “<USERNAME>:<PASSWORD> (converted to base 64)”,
“email”: “youremail@email.com”
}
}
}
As an example, you need to add these:

Here,in this step we are building Docker Images by using the command
“docker build -t localhost:8082/java-web-app-docker/demoapp:$BUILD_NUMBER –pull=true . “
where , localhost:8082 is the <jfrog server url> and java-web-app-docker is <Repository Name> and demoapp is <Image Name> and tag name is the number of the build of Jenkins Pipeline and then we are checking the images getting created.

We are able to see docker image is creating

The images are getting in docker server(localhost:8082/java-web-app-docker/demoapp:$BUILD_NUMBER

Then we are installing trivy inside Jenkins docker container to scan the images that we have created for any security vulnerabilities

For Debian/Ubuntu :
$ wget https://github.com/aquasecurity/trivy/releases/download/v0.18.3/trivy_0.18.3_Linux-64bit.deb
$sudo dpkg -i trivy_0.18.3_Linux-64bit.deb
Create another repository for Pushing Trivy Image files (Go to Administration -> Repositories -> Create a Local Generic Repository named “trivy-scan-files” and keep everything default and click create.
In the next stage , we are scanning vulnerabilities in the docker image which we have and stored the scan file in a folder in the Jenkins workspace (trivy-image-scan). Since there is no Critical Severity in the image we are pushing the Image scan files(Trivy) to Jfrog Artifactory.

Here you are able to see the trivy-image-scan in repository “trivy-scan-files”

In the next stage, we are pushing Docker Images to Jfrog since there is no Critical Severity in the image. We are first login into the jfrog by using docker login command with -u for username and -p for password. Then we are pushing the image created to Jfrog Artifactory.

Here , you are able to see that image is been pushed to repository “java-web-app-docker” with 27 tag .

Go to Application Packages in Jfrog Platform, you will be able to see the images been pushed with tag numbers

As a best practice, since we don’t have the requirement to use the docker images we are cleaning the docker images.

For Jenkinsfile and Simple Maven Project you can use this github link for reference : Jenkins_with_Jfrog


Comments
Post a Comment