Istio Service Mesh
Micro Service Challenges:
Companies with large monolithic applications are breaking their applications into smaller microservices, as microservices offer agility, speed and flexibility. But during the process there are many hurdles which developers face like:
• How are the requests routed between services?
• Securing the communication
• How do I detect failures and downtime?
• How to upgrade and test new versions of a service?
• Applications isn’t running in green field environments
• Challenges in the network in between the services
• N/w layer is hard to manage
For all these problems, we use Service Mesh.
Problem Solved by Service Mesh:

What is Service Mesh ??
A service mesh is a dedicated infrastructure layer that you can add to your applications. It allows you to transparently add capabilities like observability, traffic management, and security, without adding them to your own code. The term “service mesh” describes both the type of software you use to implement this pattern, and the security or network domain that is created when you use that software.
Earlier the business logic and the network were merged into one. So developers had to write code for mTLS or circuit breaker and many more functionalities , which wasted so much time and they couldn’t focus on business logic. But using Service Mesh the sidecar proxy decouples the business logic from network and enables developers to focus on business logic and Istio manages envoy proxy.
Istio Service Mesh:

Istio Service Mesh
There are many service mesh in market but we are used Istio as it is popular one . It is logically split into data plane and control plane.
The data plane is the communication between services. Without a service mesh, the network doesn’t understand the traffic being sent over, and can’t make any decisions based on what type of traffic it is, or who it is from or to.
Service mesh uses a proxy to intercept all your network traffic, allowing a broad set of application-aware features based on configuration you set.
An Envoy proxy is deployed along with each service that you start in your cluster, or runs alongside services running on VMs.
The control plane takes your desired configuration, and its view of the services, and dynamically programs the proxy servers, updating them as the rules or the environment changes.
BookStore Application Using Istio
Description:
The application displays information about a book entry of an online book store. Displayed on the productpage is a description of the book, book details (ISBN, number of pages, and so on), and a few book reviews.
The Bookinfo application is broken into four separate microservices:
1.productpage. The productpage microservice calls the details and reviews microservices to populate the page.
2. details. The details microservice contains book information.
3. reviews. The reviews microservice contains book reviews. It also calls the ratings microservice.
4. ratings. The ratings microservice contains book ranking information that accompanies a book review.
There are 3 versions of the reviews microservice:
a.Version v1 ==> doesn’t call the ratings service.
b.Version v2 ==> calls the ratings service, and displays each rating as 1 to 5 black stars.
c.Version v3 ==> calls the ratings service, and displays each rating as 1 to 5 red stars.
Architecture of the BookStore Application :-

BookStore Application without Istio
To run the application with istio , we simply need to configure and run the services in an Istio-enabled environment, with Envoy sidecars injected along side each microservice.
The default Istio installation uses automatic sidecar injection. Label the default namespace that will host the application with istio-injection=enabled:
kubectl label namespace default istio-injection=enabled

BookStore Application with Istio
All of the microservices will be packaged with an Envoy sidecar that intercepts incoming and outgoing calls for the services, providing the hooks needed to externally control, via the Istio control plane, routing, telemetry collection, and policy enforcement for the application as a whole.
Deploying the Application Services (Installation on GKE)
1. Go to the Istio page to download the installation file for your OS and move to the Istio package directory. Add the istioctl client to your path (Linux or macOS):
a.Enable the Google Kubernetes Engine API.
b. Create a GKE Cluster: gcloud container clusters create istio-gke-capability — region us-central1 — node-locations us-central1-a — num-nodes 2 — machine-type=n1-standard-2
c. Get the credentials for your new cluster : gcloud container clusters get-credentials istio-gke-capability — region=us-central1 — project=sincere-bongo-349311
d. curl -L https://istio.io/downloadIstio | sh -
e. cd istio-1.14.1
f. export PATH=$PWD/bin:$PATH
g. istioctl install — set profile=default -y

2.Check the envoy proxy pods are running in istio-system namespace. (By default istiod and istio-ingressgateway is installed)
kubectl get ns
kubectl get pods -n istio-system

3. Add a namespace label to instruct Istio to automatically inject Envoy sidecar proxies when you deploy your application later:
kubectl label namespace default istio-injection=enabled

4. Deploy the BookStore Application ( Contains ProductPage, Details,Review and Rating Microservice)
This microservice is already present in this path : Istio Service Mesh

kubectl apply -f bookinfo.yaml

You can check that 2 containers are running in each pod . One is the envoy sidecar proxy and the other is the microservice. You can check by using describe command
kubectl describe pod [pod-name]


kubectl get services

5.Verify everything is working correctly up to this point. Run this command to see if the app is running inside the cluster and serving HTML pages by checking for the page title in the response:
Returns the title of the HTML Page of productpage
kubectl exec “$(kubectl get pod -l app=ratings -o jsonpath=’{.items[0].metadata.name}’)” -c ratings — curl -sS productpage:9080/productpage | grep -o “<title>.*</title>”

6.We need to change the type of istio-ingressgateway service from ‘LoadBalancer’ to ‘ClusterIP’

Changed the type from LoadBalancer to ClusterIP

Architecture Diagram of Book Info Application exposed with TCP Load balancer

To manage the external traffic, you need a load balancer that is external to the mesh.
By default Google Cloud deploys a public TCP/UDP load balancer. The load balancer listens at port 80 and forwards traffic to IstioIngressGateway . The Gateway
configures port ,protocols and acts a virtual host routing , which with the help of virtualservice routes the traffic to the actual microservice.
Although, we can see use the default TCP/UPD Load Balancer with Istio Service Mesh. But it doesn’t have additional features which Global Http(s) Load Balancer has.
Advantages of External HTTP(S) load balancer
• This is a global load balancer that is implemented as a managed service on Google Front Ends. It works on Layer 7.
• TCP Load Balancer is Regional and works in L4 Layer while HTTP(s) Load Balancer is Global and works in L7 (Application Layer).
• DDoS defense and traffic filtering at the edge with Google Cloud Armor
• API gateway functionality with IAP
• It supports advanced traffic management capabilities such as
• traffic mirroring, weight-based traffic splitting, request/response-based header transformations.
• Can access backends across multiple regions
- Automatic public certificate creation and rotation with Google-managed certificates
Exposing service mesh applications through GKE Ingress (L7 HTTPS Global Load Balancer)

a. Add annotations in the Istio-IngressGateway svc
This Service has the following annotations that set parameters for the Ingress load balancer when it’s deployed:
- cloud.google.com/backend-config refers to the name of a custom resource called BackendConfig. The Ingress controller uses BackendConfig to set parameters on the Google Cloud BackendService resource. You use this resource in the next step to define custom parameters of the Google Cloud health check.
- cloud.google.com/neg: ‘{“ingress”: true}’ enables the Ingress backends (the mesh ingress proxies in this case) for container-native load balancing. For more efficient and stable load balancing, these backends use network endpoint groups (NEGs) instead of instance groups.
- cloud.google.com/app-protocols: ‘{“https”:”HTTP2"}’ directs the GFE to connect to the service mesh’s ingress gateway using HTTP2 with TLS as described in Ingress for External HTTP(S) Load Balancing and External HTTP(S) Load Balancing overview, for an additional layer of encryption.
b. Apply backend Service settings
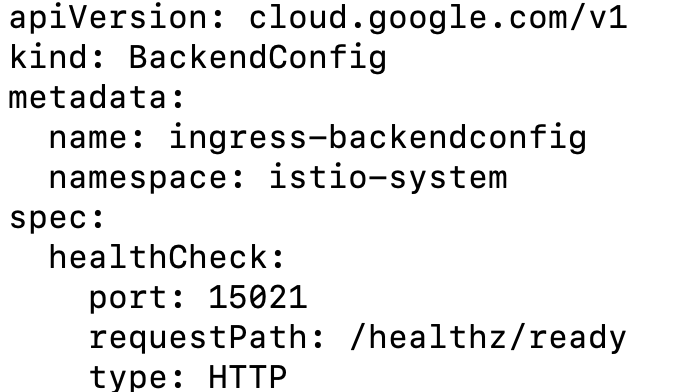
BackendConfig is a Custom Resource Definition (CRD) that defines backend parameters for Ingress load balancing. Custom health check parameters are required because the serving port 443 of mesh ingress proxies is different from their health check port 15021 . GKE Ingress uses the following health check parameters in BackendConfig to configure the Google Cloud load balancer health checks.
healthCheck.portdefines the port that receives a health check by the Google Cloud load balancer on each Pod's IP address.healthCheck.requestPathdefines the HTTP path that receives a health check on the specified port.typedefines the protocol of the health check (in this case, HTTP).
Service annotations are not applied to a Google Cloud load balancer until the Ingress resource is deployed. The Ingress deployment ties all of these resources together.
c. Provision a TLS Managed certificate

This YAML file specifies that the DNS name created , is used to provision a public certificate. Because Google fully manages the lifecycle of these public certificates, they are automatically generated and rotated on a regular basis without direct user intervention.
Inspect the ManagedCertificate resource to check the progress of certificate generation:
kubectl describe managedcertificate gke-ingress-cert -n istio-system


Certificate Status is Active.d. Deploy the Ingress resource

This manifest defines an Ingress resource that ties all of the previous resources together. The manifest specifies the following fields:
- kubernetes.io/ingress.allow-http: “false” disables HTTP traffic on port 80 of the Google Cloud load balancer. This effectively prevents any clients connecting with unencrypted traffic because port 443 only listens for HTTPS, and port 80 is disabled.
- kubernetes.io/ingress.global-static-ip-name: “istio-lb” links the previously created IP address with the load balancer. This link allows the IP address to be created separately from the load balancer so that it can be reused separately from the load balancer lifecycle.
- networking.gke.io/managed-certificates: “gke-ingress-cert” links this load balancer with the previously created Google-managed SSL Certificate resource.
We have attached an elastic ip to the HTTP(S) LoadBalancer.


e. Configure the ingress gateway

Gateway describes a load balancer operating at the edge of the mesh receiving incoming or outgoing HTTP/TCP connections. The specification describes a set of ports that should be exposed, the type of protocol to use, SNI configuration for the load balancer, etc.
The following Gateway configuration sets up a proxy to act as a load balancer exposing port 80 (http) for ingress. The gateway will be applied to the proxy running on a pod with labels istio: ingressgateway . While Istio will configure the proxy to listen on these ports, it is the responsibility of the user to ensure that external traffic to these ports are allowed into the mesh.
f. Configure the virtual service to send traffic routes to microservices

A VirtualService can then be bound to a gateway to control the forwarding of traffic arriving at a particular host or gateway port. It defines a set of traffic routing rules to apply when a host is addressed. Each routing rule defines matching criteria for traffic of a specific protocol. If the traffic is matched, then it is sent to a named destination service (or subset/version of it) defined in the registry.
The following virtual service forwards all the HTTP requests with path starting ‘/productpage’ , ‘/static’ , ‘/login’ , ‘/api/v1/products’ , ‘/logout’
to productpage service .
Your Online BookInfo frontend is displayed


Now , you are able to see 3 versions of the rating microservice.
When Users are sending requests to HTTP(S) Load Balancer , which has static IP attached to it. GCP Managed Certificate is attached to HTTP(S) Load Balancer , which provide privacy and security when users forward traffic . In GKE, an Ingress Object defines rules for routing HTTP(S) traffic . So when you create an Ingress Object , the GKE Ingress Controller creates a Global HTTP(S)Load Balancer.
The HTTP(S)LoadBalancer listens on port 443 and forwards the request to one of the workers.
The Ingress Object has rules defined for routing https traffic to istio-ingressgateway service.
The istio-ingressgateway service makes the HTTP(S) Load Balancer healthy by configuring the BackendConfig at port 15021. It forwards the request to Istio-IngressGateway Deployment.
The Istio-IngressGateway Deployment is configured by Gateway and VirtualService.
The Gateway configures the ports , protocols and certificates. The VirtualService configures routing information to find the correct service .
The Istio-IngressGateway Deployment routes the request to the Envoy Proxy which forwards the request to the productpage service.
Install addons functions of Istio (Kiali, Jaegar, Prometheus ….)
Istio integrates with several different telemetry applications. These can help you gain an understanding of the structure of your service mesh, display the topology of the mesh, and analyze the health of your mesh.
kubectl apply -f samples/addons
kubectl get pods -n istio-system

Prometheus and Grafana: with Istio to record metrics that track the health of Istio and of applications within the service mesh and Grafana for visualization
Kiali: Understand the structure and health of your service mesh by monitoring traffic flow to infer the topology and report errors.
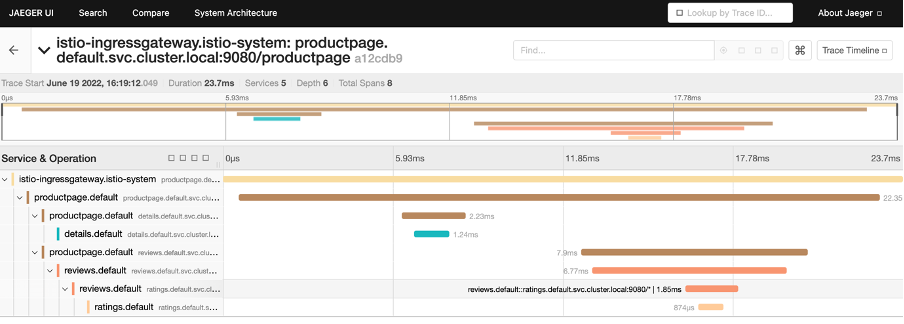
Jaegar: allowing users to monitor and troubleshoot transactions in complex distributed systems.
Access Kiali by PortForwarding: kubectl port-forward svc/kiali 20001:20001 -n istio-system
To see trace , you must send request to your service :
for i in $(seq 1 1000); do curl -s -o /dev/null “https://test.istio.online/productpage"; done


Access Jaegar: kubectl port-forward -n istio-system $(kubectl get pod -n istio-system -l app=jaeger -o jsonpath=’{.items[0].metadata.name}’) 16686:16686 &
Access Grafana: kubectl port-forward svc/grafana 3000:3000 -n istio-system

Creating Traffic Splitting where 100% traffic request will go to review v1 pod(microservice) and 0% traffic to other v2 and v3 pods.
Steps: -
a. Go to reviews microservice details page
b. Click on Actions + Traffic Shifting and add 100% traffic to v1 and 0% to v2 and v3 and click create
c. VirtualService and DestinationRules are automatically generated from kiali console
VirtualService: It defines a set of traffic routing rules to apply to a kubernetes service or subset of service based on the matching criteria.
DestinationRule: It defines policies that apply to traffic intended for a service after routing has occurred.


Example of Traffic Splitting , sending 100% traffic to reviews v1 microservice

Now you are able to see the virtualservice and destination rules applied

From the dashboard we are clearly able to see all the traffic are send to v1 Reviews service.
Creating Traffic Shifting where 70% traffic request will go to review v1 pod(microservice) and 30% traffic to other v2 and 0% traffic to v3 pods.


From the Kiali Dashboard (Versioned Graph), you are able to see that 70% traffic goes to Reviews v1 microservice and 30% to Reviews v2 microservice.
To read more about BookInfo Application : BookInfo Application
To get the code for the given content : Istio Service Mesh


Comments
Post a Comment