How to Start with Terragrunt

In this article, we will be explaining how to start with terragrunt. We have created a simple VPC and subnets in GCP by using terragrunt which in under hood is using terraform modules.
What is Terragrunt??
Terragrunt is a thin wrapper that provides extra tools for keeping your configurations DRY, working with multiple Terraform modules, and managing remote state.
Challenges of Terraform
If your infrastructure is very large and complex and it has multiple environments in it, then we have to duplicate the same code in each environment and it becomes very tedious process to do so. Terragrunt will keep your terraform code DRY so that we can reuse the same code in different environments, regions .
Features of Terragrunt
1. It helps to create and manage remote state configuration.
2. It helps to work with multiple accounts
3. It has the capability to handle the Terraform lock file.
4. It helps to achieve DRY Terraform code .
5. It helps to avoid tasks of running commands on each module separately with “extra_arguments” block.
To get more idea about different features , refer its offical documentation :
https://terragrunt.gruntwork.io/docs/#getting-started
Install Terragrunt
1. Go to the Releases Page.
2. Downloading the binary for your operating system.
3. Rename the downloaded file to “terragrunt”
4. Add execute permissions to the binary. E.g., On Linux and Mac: chmod u+x terragrunt
5. Put the binary somewhere on your PATH. E.g., On Linux and Mac: “mv terragrunt /usr/local/bin/terragrunt”
You can also use package manager to install terragrunt
$brew install terragrunt → MAC

Now, check the version of terragrunt and terraform

Steps to create a simple VPC and Subnets in GCP

This is the project structure we are following . So, Terragrunt heavily relies on modules so that we can keep our code dry without polluting with the duplicate code.
We will create 2 directories , one for “dev” and one for “qa “ environment. Inside those we will be creating “network” directory where we will be implementing our vpc and subnet.
Outer Terragrunt.hcl
Create a file in the outer “terragrunt.hcl” in path “terragrunt-gcp/ terragrunt.hcl” to add some local variables, provider block and a common backend block.

We are assigning some common local values which can be used in child terragrunt.hcl files declared inside the network directory of dev and qa environment.
Here we have 3 local variables, project which is the GCP project name and subnet_region_1 and 2 for subnet regions where we want our subnets to create.
The provider can be optional and it can be avoided if the provider.tf configuration exists already inside DEV or QA environment. The above provider configuration is generating “provider.tf” if not created and if it already exists then it will overwrite and put the data which is present in contents attribute
The above backend configuration is generating “backend.tf”if not created and if it already exists then it will overwrite and put the data which is present in contents attribute.
Like in terraform, we need to create backend.tf for each of the environments , here in terragrunt we have an advantage that we can create a common backend.tf file for each of the environment and just changing the “prefix” field .
Here the function “path_relative_to_include()“ returns the relative path between the current file and the path specified in its include block( include block mentioned in child terragrunt.hcl file(dev and qa)).
So here the prefix would be “dev/network/terraform.tfstate/default.tfstate” for dev environment and “qa/network/terraform.tfstate/default.tfstate” for qa environment.
Environment.hcl

Then we have created some environment.hcl files in path “terragrunt-gcp/dev/environment.hcl” where we have assigned some local variables which is environment specific and this is used in child terragrunt.hcl files declared inside the network directory of dev and qa environment.
Here we have assigned environment variable as “dev”

Here we have assigned environment variable as “qa” (“terragrunt-gcp/qa/environment.hcl”)
Child terragrunt.hcl created in Network directory
Create a file “terragrunt.hcl” in path “terragrunt-gcp/dev/network/terragrunt.hcl” to reference networks module in GCP.

In this line we are telling terragrunt to fetch the terraform code using the source attribute from the
“terraform-google-modules/network/google” module hosted in public with latest version “5.1.0”. You need to start using “tfr://” protocol in the URL

Here we are retrieving the local values from parent terragrunt.hcl and environment.hcl files and assigning into “environment_config” and “common_config” variables.
So, the “read_terragrunt_config()” parses the terragrunt config at the given path and serializes the result into a map that can be used to reference the values of the parsed config. This function will expose all blocks and attributes of a terragrunt config. Like here “environment_config” will hold map structure like :
{
environment = “dev”
}
So to extract individual values inside map, the syntax is
variable_name = local.<map_variable_name>.locals.<variable>
Eg: To get the environment variable value defined in environment.hcl, we will do
environment = local.environment_config.locals.environment
And the “find_in_parent_folders(<name of the .hcl which is of different name>)” searches up the directory tree from the current terragrunt.hcl file and returns the absolute path to the first terragrunt.hcl in a parent folder or exit with an error if no such file is found. This is primarily useful in an include block to automatically find the path to a parent.

This include block automatically finds the path to the parent terragrunt.hcl file.

In the inputs section we define the input configuration present in GCP networks module . We need to atleast provide the mandatory inputs.
So, as we have seen we have declared certain variables in child terragrunt.hcl like environment, subnet_region_first. We are using these values in inputs section.

This is the terraform network module in gcp . Here the mandatory parameters is “project_id” and “network_name” and “subnets”.
Run — terragrunt init, terragrunt plan and terragrunt apply
Before running the terragrunt init command you must switch to the directory where the child terragrunt.hcl is present . Go to the path ( terragrunt-gcp/dev/network/ and similarly do in qa too) and then
export GOOGLE_APPLICATION_CREDENTIALS= <Path of the credentials file which we have got from service account>

Then do terragrunt init in each environment. This was for DEV environment.

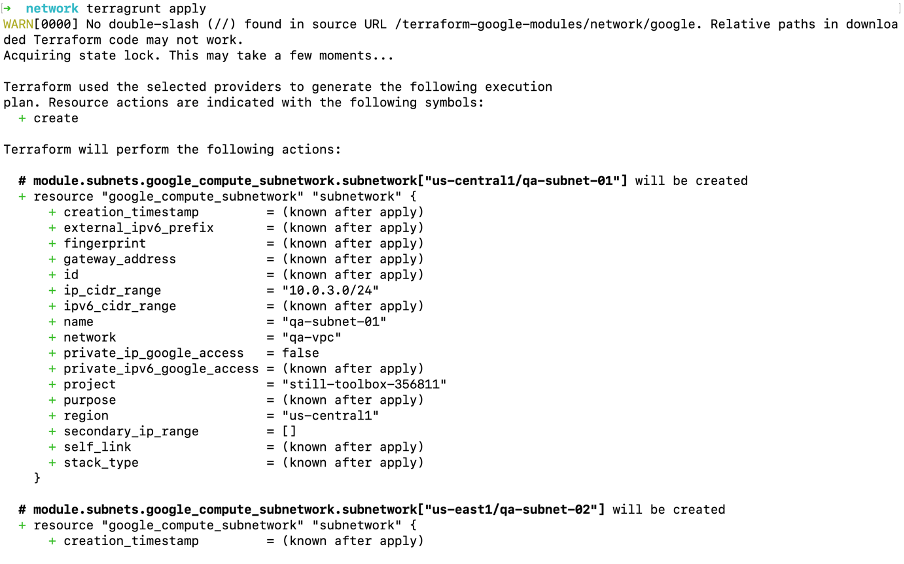
Then do terragrunt plan Same as terraform, It will return you back with the information on how many resources it is going to add, update or destroy.


This was for QA environment


Then we will do terragrunt apply To create resources if everything is right. This is for DEV environment.


This is for QA environment.

Now let’s see the resources on GCP Console

Two vpc’s are created, one as “dev-vpc” and another as “qa-vpc”. And 2 subnets are created in each VPC.

These are the default routes in network “dev-vpc” which are automatically created with VPC resource.

These are the default routes in network “qa-vpc” which are automatically created with VPC resource.
Now let’s check the backend state files in GCS Bucket.

This is the folder structure for the state files. One is for dev and another for qa.

State file for DEV environment

State file for QA environment


Comments
Post a Comment