AWS Cloud — Basic Networking

Here, in this article we are going to see the basic networking architecture of AWS like public subnet, private subnet, Internet Gateway and Nat Gateway and how to configure them to get internet access in Virtual Machines.
Steps to create the flow

VPC –> It enables you to launch AWS resources into a virtual network that you’ve defined.
Create a VPC named “DemoVPC”, add Ipv4 CIDR block as “10.0.0.0/16” (put the cidr range as per your need) and then click Create

Subnets -> It is a range of IP addresses in your VPC.
Create public subnet named as “PublicSubnet1”, add Availability Zone as “us-east-1a” and add Ipv4 CIDR block as “10.0.1.0/24” (put the cidr range as per your need) and then click Create

Create private subnet named as “PrivateSubnet1”, add Availability Zone as “us-east-1b” and add Ipv4 CIDR block as “10.0.2.0/24” (put the cidr range as per your need) and then click Create


Create a VM named as “DemoPublicVM” which is created in “DemoVPC” with public subnet “PublicSubnet1” and auto-assign public IP as Enable (it will auto-assign public IP to the VM) and add Security Group [ Type: ssh, Source type as My IP : <Add your ip/32> and in a similar manner add “icmp” too] and then click Create

If we try to connect to VM using Instance connect, we are get “There was a problem connecting to your instance”.
The subnets by default, do not have access to internet. Therefore, we use Internet Gateway (public subnet) for it.
Internet Gateway -> It enables resources (like EC2 instances) in your public subnets to connect to the internet if the resource has a public IPv4 address or an IPv6 address.

Create an Internet Gateway named as “Demo-IGW” and click Create.

And then attach the Internet Gateway to the VPC “DemoVPC” to enable the VPC to communicate with the internet.


Then we need to configure the route tables. Create two route tables, one for public subnet named as “PublicRouteTB” and another for private subnet named as “PrivateRouteTB” and add the “DemoVPC” and click Create

Then click on route table “PublicRouteTB” and edit subnet association and select “PublicSubnet1” .

In routes section attach Destination as “0.0.0.0/0” and Target as Internet Gateway which you have created earlier. So , it means any ip apart from 10.0.0.0/16 will go to Internet Gateway .

Now, if you connect to the VM “DemoPublicVM” through Instance Connect and ping google.com , you can see data coming from google and data packets are transmitted.
Let’s create a VM in private subnet and let’s access internet from that VM. To do this we commonly use NAT Gateway .
You can use a NAT gateway so that instances in a private subnet can connect to services outside your VPC but external services cannot initiate a connection with those instances.

Go to VPC > NAT Gateways and click Create NAT Gateways and name it as “DemoNatGateway” and attach public subnet to it and assign Elastic Ip to it and click Create.

Go to Route Tables “PrivateRouteTB” and edit subnet associations and select “PrivateSubnet1” .
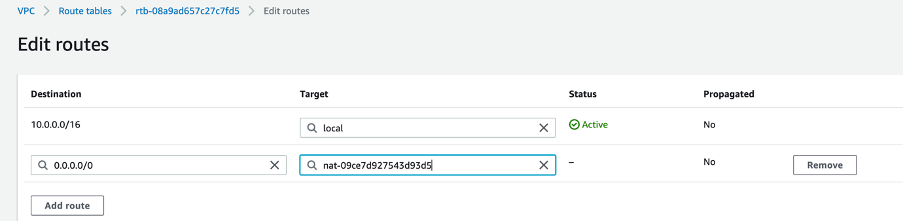
In routes section attach Destination as “0.0.0.0/0” and Target as NAT Gateway which you have created earlier. So , it means any ip apart from 10.0.0.0/16 will go to NAT Gateway.


Create a VM named as “DemoPrivateVM” which is created in “DemoVPC” with private subnet “PrivateSubnet1” and add Key Pair and then add Security Group [ Type: ssh, Source type as Custom: <Add security group of DemoPublicVM>] and then click Create. We will access the private VM through Public VM as both are in same VPC, so they can communicate through private IP’s.

Create a Key Pair file as “DemoKeyPair.pem” in your Public VM and copy the key content here.

Then change the permission of the file “chmod 0400 <file_name.pem>” and do :
$ ssh ec2-user@<privateIP_of_PrivateVM> -i <.pem file>
If you ping google.com, you can see data coming from google and data packets are transmitted.


Comments
Post a Comment